
A few weeks ago, I completed my preparations for summer by purchasing a new charcoal grill/smoker combo. I almost immediately used it as a grill to cook up the usual batches of burgers and dogs that most people associate with summer cookouts, but I had bigger ambitions than that for my new toy. I've never used a smoker before, and a rack of ribs seemed the bet place to start experimenting.
Why pork ribs? Well, they were on sale this week, but that wasn't the only consideration. The rule of thumb seems to be about an hour in the smoker per pound of meat- the rib racks were just under three pounds each- meaning I could smoke them in a single afternoon rather than making this an all day affair.

Using a smoker is all about being prepared ahead of time- you need to have a good supply of fuel (charcoal) and a good supply of the specific wood you plan on using for smoke (I used cherry this time). For best results, you should take your meat out the night before and season it- I ave my ribs a good dry rub made of coarse sea salt, black pepper, paprika, garlic, and cumin. After rubbing in the seasonings, I wrapped them in cling wrap, and let them rest in the refrigerator over night. This gives the seasoning a chance to sink in, and bring proteins to the surface that will help form a crust during cooking.

The key is to keep feeding new coals to the firebox to keep the main chamber around 200 degrees. For the smoke, you'll need to periodically feed a few chunks of your hardwood to the fire. Keep a large bowl or bucket full of water and soak your wood chunks for about 30 minutes or so before use. This soak time will prevent the wood pieces from burning too quickly, and ensure that they produce a large amount of smoke.

Once your fire is going, lay your rib racks on the grill. Since my smoker has it's firebox on one side, that side of the grill is generally at a higher temperature than the other. I'm going to start my racks on the hot side of the smoker. If they get to the point where they look like they are cooking too fast, they can be moved to the cooler side. Once the meat is in, you want to leave the cover closed as much as possible. Peeking in on them too much will cause the temperature to drop and interfere with cooking. Concentrate on adding more fuel to the fire to keep the temperature as consistent as possible, and try to limit how often you check your meat. If you maintain the heat, it will cook. I estimated that I would need about 3 hours, but my temperature was running a little low in general, so I extended to almost four hours.
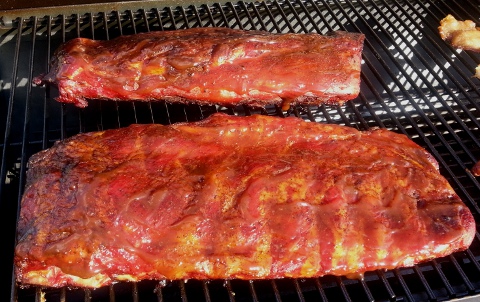
I didn't start my fire with enough fuel, so it was a struggle to maintain temperature. I was worried that my ribs would either not be cooked through, or would be dried out. The few quick spot checks I did made me wonder- the ribs still looked reddish and didn't have the char on the outside I was used to seeing from the grill. When I actually took a better look at the end, they were actually cooked just about right- so trust your temperature control and your timing. When the main cooking was done, I brushed my racks with a light coating of barbecue sauce, and closed the lid for a few more minutes to let the sauce caramelize a little. I basically used just enough sauce to barely coat the top of the rack- I actually prefer them cooked with less sauce, so I can dip them when I eat if I'm so inclined.

My fears about raw meat, or dry tough meat vanished when I started cutting up the ribs. The meat was cooked through, and was much more juicy than they looked from the outside. They were not quite "fall off the bone" tender, but they were pretty good for a first attempt. The meat was mostly pinkish from the smoke, but was still clearly cooked through. Now that I've actually done it, and have a better feel for the process, I'm looking forward to smoking more meats this summer.
No comments:
Post a Comment